Installation Notes for Adaxes 2013.2
This document contains requirements and instructions on how to install Softerra Adaxes 2013.2.
System Requirements
The tables below outline software and hardware requirements for installing and running the Softerra Adaxes components.
Supported Operating Systems
| Adaxes Service* | Service Administration Console |
|---|---|
|
|
* Prior to install Adaxes Service on Windows 7 or Windows Vista, you need to install Active Directory Lightweight Directory Services (AD LDS). For details, see How to install AD LDS on Windows 7 and Windows Vista.
| Web Interface/SPML Web Service* | PowerShell Module for AD |
|---|---|
|
|
* It's highly recommended to install Web Interface and SPML Web Service on the server editions of Windows because when installed on workstations, IIS has a limitation on the number of simultaneous connections. In this case, the connection limit can be reached when, for example, only two or three persons are using the Web Interface at the same time.
Important: To install Softerra Adaxes, the target computer must be joined to an Active Directory domain.
Hardware Requirements
The minimum hardware required to install and run Softerra Adaxes components includes:
| Adaxes Service | Service Administration Console | Web Interface | SPML Web Service |
|---|---|---|---|
|
|
|
|
Note: Hardware requirements depend on the total number of objects managed by your Adaxes service.
Installation Prerequisites
Softerra Adaxes components require Microsoft .NET Framework 3.5 SP1 to be installed
on the target system.
To install the framework, see How to install Microsoft .NET
Framework 3.5 SP1.
To install Adaxes Service on Windows 7 or Windows Vista, first you need to install Active Directory Lightweight Directory Services (AD LDS). For details, see How to install AD LDS on Windows 7 and Windows Vista.
To use cmdlets included in PowerShell Module for Active Directory, Windows PowerShell 2.0 is installed on the target computer. For details, see How to install Windows PowerShell 2.0.
Installation
Note: To install Softerra Adaxes, you must log on to your computer using an account that belongs to the local Administrators group.
All Adaxes components (Adaxes Service, Web Interface, Administration Console, PowerShell Module, etc.) are installed using a single installation package. It is not necessary to install all the components on a single computer. In case you need to install different components on different computers, install the Adaxes service first, because to install other components you will need to specify the network location of the Adaxes service.
Installation Instructions
To install Softerra Adaxes:
- Log on to the operating system under a user account that has local administrator permissions on the target computer and is a member of an Active Directory domain.
- Install Microsoft .NET Framework 3.5 SP1, if not installed. For details, see How to install Microsoft .NET Framework 3.5 SP1.
- Launch the Softerra Adaxes installation package (.msi) for the language and OS architecture
you want.
Note: All Softerra Adaxes components (Adaxes Service, Service Administration Console, Web Interface and SPML Web Service) are installed by a single MSI package.
- The Welcome screen appears. Read the information provided and click Next.
- Accept the license agreement and click Next.
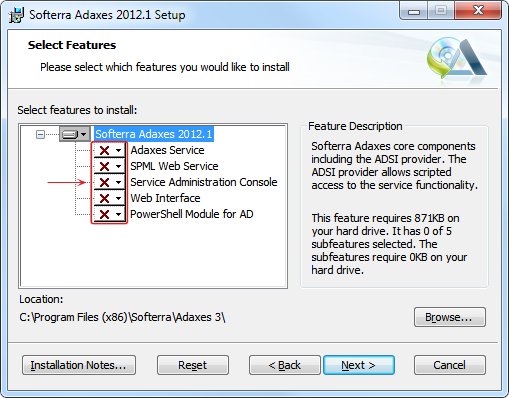
- Select the Adaxes components you would like to install and click Next.
Please note that different Adaxes components have different system and hardware requirements. For details, see System Requirements.
If you select none of the Adaxes components, only the Softerra Adaxes ADSI provider is installed. - If you have selected Adaxes Service, do the following:
- On the Service Administrator page, specify the default administrator for
the service. Service administrators have unrestricted access to the service configuration
and can perfrom all service-related administrative tasks and all operations in the
AD domains managed by the service. The account for the default service administrator
also determines the security context, in which the Adaxes Service runs (the service
will use this account to log on to the system).
The default service administrator account should have enough privileges to publish and unpublish the Adaxes service in Active Directory (create/delete a service connection point). By default, domain administrators have the necessary permissions. For more information on how to grant these permissions to another user, see Grant Permissions to Publish Adaxes service.
Note: Although the list of service administrators can be modified after the service installation, the default service administrator cannot be removed or changed.Click Next.
Note: The AD domain of the default service administrator will be automatically registered to be managed by Adaxes. - On the Service Configuration page, you can set up the new Adaxes service
to join an existing Adaxes configuration set. In this case the service will share
its configuration with all the services contained in the configuration set.
To join an existing configuration set, click Share configuration, specify the DNS host name of any Adaxes service from the configuration set, and select an account with administrative credentials for the service. Usually, all default administrators of the services contained in a configuration set have the necessary administrative permissions.
Click Next. - On the Ready to Install page, you can define whether to open the Windows Firewall port that is used for communication between Adaxes Clients (e.g. Adaxes Administration Console or Adaxes Web interface) and Adaxes service. If the Open port 54782 in Windows Firewall option is enabled, an inbound rule for port 54782 will be added in Windows Firewall. If you uninstall Adaxes, the rule will be deleted automatically.
- On the Service Administrator page, specify the default administrator for
the service. Service administrators have unrestricted access to the service configuration
and can perfrom all service-related administrative tasks and all operations in the
AD domains managed by the service. The account for the default service administrator
also determines the security context, in which the Adaxes Service runs (the service
will use this account to log on to the system).
- If you have selected Web Interface, do the following:
- On the Web Interface Types page, select Web Interface types you want to install
and configure IIS web site parameters for each Web Interface type.
By default, each Web Interface type allows users to handle tasks that are typically assigned to their job role in the company:
- Web Interface for Administrators
Allows Active Directory administrators to perform practically any operation in Active Directory. - Web Interface for Help Desk
Allows Help Desk operators to handle tasks related to user account management like password reset, unlock/enable/disable user accounts, modify general properties of AD objects, etc. - Web Interface for Self-Service
Allows regular users to accomplish self-service tasks without any assistance from administrators or Help Desk staff. Users can update their private information, change passwords, perform basic searches in AD, etc.
Note: After the installation, you will be able to configure the installed Web Interfaces to meet the specifics of your company.Click Next. - Web Interface for Administrators
- On the Service for Web Interface page, specify the DNS host name of the Adaxes
service the Web Interface will connect to. If the specified Adaxes service shares
its configuration with other Adaxes services, the Web Interface will connect to
the nearest available Adaxes service contained in the configuration set.
Note: This page is not available if you install Adaxes Service and Web Interface at the same time. In this case, the Web Interface will use the Adaxes service installed during this installation.Click Next.
- On the Web Interface Types page, select Web Interface types you want to install
and configure IIS web site parameters for each Web Interface type.
- If you have selected SPML Web Service, do the following:
- On the SPML Web Service Address page, configure IIS web site parameters of the SPML Provider and click Next.
- On the AD Access for SPML Web Service page, specify how you want the Adaxes
SPML Provider to access Active Directory. Adaxes SPML Provider can access Active
Directory directly or via an Adaxes service. Provisioning Active Directory via the
Adaxes service allows you to benefit from the Softerra Adaxes features such as Business
Rules, Security Roles, Property Patterns. If the SPML Provider accesses Active Directory
through an Adaxes service and this service shares its configuration with other Adaxes
services, the SPML Provider will connect to the nearest available Adaxes service
contained in the configuration set.
Note: This page is not available if you install Adaxes Service and SPML Web Service at the same time. In this case, the SPML Web Service will use the Adaxes service installed during this installation.Click Next.
- On the Ready to Install page, click Install to begin the installation.
Depending on the features you've selected, the setup program may install additional components on your system. For details, see Additional Components.
|
Note:
During the installation you might be prompted to provide the Windows installation files. It might be necessary to install Windows components used by Softerra Adaxes (e.g. Web Interface and SPML Web Service require Microsoft IIS that is a Windows component). If the Insert Disk dialog box appears, use one of the following methods:
|
Rights Granted to Adaxes Service Logon Account
Since the Adaxes service uses the account of the default service administrator to log on to the system, the setup program grants the 'Log on as service' right to this account.
When the Adaxes service is installed on a workstation rather than on a domain controller, this right is granted locally on this workstation via the Local Policy settings. If there is a conflicting domain-based Group Policy object that grants the 'Log on as service' right to other users, the local right granted by the setup program will be removed during the Group Policy refresh, because the domain-based Group Policy settings override the Local Policy settings. If this happens, the Adaxes service will not start. In this case contact your domain administrator to grant the 'Log on as service' right to the account of the default service administrator in a precedent domain-based Group Policy.
Multi-Server Deployment for High Availability
For many configurations it is desirable to install Adaxes service on multiple computers in order to achieve fault tolerance and load balancing. In a multi-server environment there are multiple Adaxes services that share common configuration (managed AD domains, Security Roles, Business Rules, Scheduled Tasks, etc.). Clients connect to the nearest available Adaxes service. If an Adaxes service becomes unavailable, clients are automatically switched to another one.
Adaxes services sharing common configuration form a logical grouping called a configuration set. When the configuration of an Adaxes service is modified, the configuration of other services in the configuration set becomes inconsistent with the most up-to-date configuration. As the changes get replicated through the configuration set, all service configurations become identical once again. Adaxes uses a type of replication called multimaster replication.
In many circumstances it may be sufficient to use a single-server configuration. However, if you have a geographically distributed environment, or there is a heavy load on the Adaxes service, or you want to improve the availability of your Adaxes service, you may consider a multi-server approach.
To setup a multi-server configuration:
- Install the first instance of Adaxes service. This will create a configuration set with only one Adaxes service.
- During installation of subsequent instances of Adaxes service, join each new service to the configuration set. For this purpose, on the Service Configuration page of the installation wizard, select the Share configuration option and specify the DNS host name of any Adaxes service from the configuration set. To join a service to a configuration set you will need to provide the credentials of the default administrator of any Adaxes service contained in the configuration set.
Deploying Web Interface to a Web Farm
You can install Adaxes Web Interface in a web farm if you want to share the web-site traffic across multiple servers, improve site availability, and balance load among sites.
To install Adaxes Web Interface in a web farm:
- Install Adaxes Web Interface on the Primary Server in the web farm.
-
Since the Web Interface requires Adaxes ADSI provider, install Adaxes ADSI provider
on each Secondary Server in the web farm.
To install Adaxes ADSI provider:
- Launch the Adaxes installation wizard.
-
On the Select Features page, deselect all the features and click Next.
- Finish installation by following the instructions in the wizard.
Note: When you upgrade the Web Interface you will also need to upgrade the Adaxes ADSI provider on each Secondary Server in the web farm.
-
Configure client affinity for the web farm. Since Adaxes Web Interface requires all client
requests to be routed to the same web server during a client session, you need to configure
load balancing to map a client to a Web Interface for the duration of a client session.
The load balancing algorithm must be applied only for the very first request from the client.
From that point on, all subsequent requests from the same client must be routed to the same
Web Interface for the duration of the client session.
To configure client affinity if you use the Application Request Routing module:
- Launch Internet Information Services (IIS) Manager.
- Select the server farm and double-click Server Affinity.
- Enable the Client affinity option and click Apply.
To configure client affinity if you use F5 BIG-IP Local Traffic Manager (LTM):
A similar load balancing model needs to be applied if you use F5 BIG-IP LTM. This is achieved by configuring Source Address Persistence.
- Go to the F5 BIG-IP LTM configuration page.
- Expand Local Traffic in the navigation panel and select Profiles.
- Open the Persistence tab and then click Create.
- In the General Properties section type the desired name of the profile you are creating.
- Select Source Address Affinity in the Persistence type drop-down list.
- Customize other settings of the profile according to your requirements and click Finished.
- Open the virtual server(s) that hosts Adaxes Web Interface and open its Resources tab.
- In the Default Persistence Profile drop-down list, select the name of the persistence profile you have created.
Installing Web Interface and Administration Console in DMZ
To make Adaxes Web Interface and Administration Console available from outside, they can be installed in the DMZ (also known as perimeter network or extranet). Web Interface can be exposed to the Internet to allow users to perform tasks like password reset and directory search when they are not on the internal network (e.g. users travelling, users working from home, or external users). If you install Adaxes Administration Console on a computer in the DMZ, Administrators will be able to connect to the computer using Remote Desktop and manage Adaxes and Active Directory from outside the internal network.
To deploy Adaxes clients in the DMZ:
- Install a Read-Only Domain Controller in the DMZ. Adaxes Web Interface and Administration Console can be installed only on the computer that is joined to an Active Directory domain. Since DMZ is usually a highly restricted piece of network, it is recommended to use Read-Only Domain Controllers. Read-Only Domain Controllers provide a one-way replication from your internal network to the DMZ and thus decrease the risk towards your network when a DMZ machine gets compromised. For details on how to deploy read-only DCs in the DMZ, see Active Directory Domain Services in the Perimeter Network.
-
Open port 54782 in the firewall. Adaxes Web Interface and Adaxes Administration
Console use port 54782 for communication with the Adaxes service.
The port number can be changed if required.
How to change the port
Change the port attribute of the following XML element in Softerra.Adaxes.Service.exe.Config:
    <configuration>
       ...
        <system.runtime.remoting>
          <customErrors mode="Off" />
          <application>
            <channels>
              <channel ref="tcp" port="54782" priority="2" secure="true">
Note: The Softerra.Adaxes.Service.exe.Config file is located in the folder where the Adaxes Service is installed (by default, C:\Program Files\Softerra\Adaxes 3\Service).
Uninstallation
Note: Before uninstalling Adaxes Service you may want to backup its configuration. For this purpose, use the Softerra.Adaxes.BackupRestore.exe tool.
To uninstall Softerra Adaxes:
- If you want to uninstall the Adaxes Service, make sure that the service is running. It is necessary to correctly unregister the service from your system (remove the service connection points and clean up the configuration set metadata).
- Open Add or Remove Programs and select the Softerra Adaxes product.
- Click Remove and follow the steps provided.
Upgrade to New Version
Upgrade a Multi-Server Configuration
If you have multiple Adaxes services sharing the same configuration, you need to reinstall them one after another. Perform the following steps for each Adaxes service in the configuration set:
Note: When upgrading from Adaxes 2012.1 (build 3.3.8815.0) and earlier, you need to perform additional steps to preserve Approval Requests.
Adaxes 2012.1 (build 3.3.8815.0) and earlier versions did not allow to restore
Approval Requests after an upgrade. Perform the following steps before
uninstalling the old version of Adaxes to preserve Approval Requests:
|
- Uninstall the old version of Adaxes.
- If you are moving an Adaxes service that shares its configuration with other Adaxes
services from one computer to another, you need to manually transfer the information on
pending Approval Requests.
How to transfer information on pending Approval Requests
- On the computer, where the previous instance of Adaxes was installed, locate
the file named AdaxesCommandQueueBackup.ldif.
A typical path to the file:
- on Windows XP: C:\Documents and Settings\All Users\Application Data\Softerra\Adaxes 3\,
- on Windows Vista: C:\ProgramData\Softerra\Adaxes 3\,
- on Windows 7/8: C:\Users\All Users\Softerra\Adaxes 3\,
- Copy the file to a similar folder on the computer to which you are transferring Adaxes service.
- On the computer, where the previous instance of Adaxes was installed, locate
the file named AdaxesCommandQueueBackup.ldif.
A typical path to the file:
- Install the new version. During the installation, join the new Adaxes service to your configuration set.
- Wait until the configuration is replicated. To make sure that the replication is complete, launch Adaxes Administration Console, connect to the newly installed Adaxes service and wait until the connection is established.
Upgrade a Single Server Configuration
If you have a single Adaxes service that does not share its configuration with any other Adaxes services, you need to back up your configuration, upgrade to a new version, and restore the configuration back. To do this, perform the following steps:
- Back up the configuration of your Adaxes service using the Softerra.Adaxes.BackupRestore.exe
tool. This tool is located in the folder where the Adaxes service is installed,
which is C:\Program Files\Softerra\Adaxes 3\Service by default.
Upgrade from Adaxes 2012.1 (build 3.3.8815.0) and earlier
Adaxes 2012.1 (build 3.3.8815.0) and earlier versions did not include Approval Requests in backup files. To be able to restore Approval Requests after upgrading, you need to manually include Approval Requests to the backup file:- Download PowerShell script.
- Unzip the script to the folder where your Adaxes service is installed (by default, C:\Program Files\Softerra\Adaxes 3\Service).
- Launch Windows PowerShell.
- Navigate to the directory where you unzipped the script. For example,
if your Adaxes service is installed in
C:\Program Files\Softerra\Adaxes 3\Service, type
cd C:\Program Files\Softerra\Adaxes 3\Service - Run the script using the following command:
.\BackupApprovalRequests.ps1 -backupFilePath "<backup_file_path>" -defaultServiceAdminName "<admin_username>"where- <backup_file_path> - the path to the backup file created on the 1st step.
- <admin_username> - the username of the default service administrator. If you are logged on as the default service administrator, you can omit this parameter.
.\BackupApprovalRequests.ps1 -backupFilePath "C:\Backup.Adaxes.Service.srvcfg" -defaultServiceAdminName EXAMPLE\Administrator - The script will output a new backup file updated with the data required to restore Approval Requests. It will be placed in the same folder as the source backup file and will have the same file name with .fixed added to the end. Use this file to restore Adaxes service configuration.
- Back up the configuration of your Web Interface using the Softerra.Adaxes.Web.UI.Configuration.exe tool. This tool is located in the folder where the Adaxes Web Interface is installed, which is C:\Program Files\Softerra\Adaxes 3\Web Interface by default.
- Uninstall the old version of Adaxes.
- Install the new version.
- Restore the configuration of the Adaxes service using the Softerra.Adaxes.BackupRestore.exe tool.
- Restore the configuration of the Adaxes Web Interface using the Softerra.Adaxes.Web.UI.Configuration.exe tool.
Additional Components
Some of the Softerra Adaxes components require additional software to be installed
in your operating system. All the additional software is installed automatically
by the setup program, however you can do it manually if the automatic installation
fails (the instructions are provided below).
The software components, the setup program is going to install, are listed on the
Ready to Install page that is shown right before the installation process
starts.
Additional software components installed automatically by the Adaxes setup program include:
| Adaxes Service | Service Administration Console | Web Interface | SPML Web Service |
|---|---|---|---|
|
|
|
|
Note: After Softerra Adaxes is uninstalled, the additional components installed automatically remain in the system.
How Do I
Install Microsoft .NET Framework 3.5 SP1
- Visit http://www.microsoft.com/downloads/details.aspx?FamilyID=ab99342f-5d1a-413d-8319-81da479ab0d7.
- Follow the instructions to download and install Microsoft .NET Framework Version 3.5 SP1.
Grant Permissions to Publish Adaxes Service
- Open Active Directory Users and Computers on a domain controller.
- Connect to the domain of the target computer (the computer on which you want to
install Softerra Adaxes).
- In the console tree, right-click Active Directory Users and Computers, and then click Connect to Domain.
- Type the domain name and click OK.
- On the View menu, select Advanced Features.
- Right-click the computer object, on which you want to install Softerra Adaxes, and then click Properties.
- On the Security tab, click Add and type the name of the user whom you want to grant the permissions to and then click OK.
- Select the Allow check boxes for the Create All Child Objects and Delete All Child Objects permissions.
- Click OK.
Install Microsoft Active Directory Application Mode (ADAM) SP1
To install ADAM, you must log on to your computer using an account that belongs to the local Administrators group.
To install ADAM on Windows Server 2003 or Windows XP:
- Visit http://www.microsoft.com/downloads/details.aspx?familyid=9688f8b9-1034-4ef6-a3e5-2a2a57b5c8e4.
- Follow the instructions to download and install Microsoft Active Directory Application Mode (ADAM) SP1.
To install ADAM on Windows Server 2003 R2:
- Log on as an administrator, click Start, point to Control Panel, and then click Add or Remove Programs.
- Click Add/Remove Windows Components.
- In the Components list, select the check box next to Active Directory Services, and then click Details.
- Select the check box next to Active Directory Application Mode (ADAM), click OK, and then click Next.
- Review the message that appears. Based on the contents of message, do one of the
following:
- If the message "You have successfully completed the Windows Component Wizard" appears, click Finish.
- If an error message appears, make a note of the error, click Finish, and then review the ADAM event messages in Event Viewer.
Install Microsoft Active Directory Lightweight Directory Services (LD LDS) Server Role
To install AD LDS, you must log on to your computer using an account that belongs to the local Administrators group.
To install the AD LDS server role on Windows Server 2008 and Windows Server 2008 R2:
- Log on as an administrator, click Start, and then click Server Manager.
- In the console tree, right-click Roles, and then click Add Roles.
- Review the information on the Before You Begin page of the Add Roles Wizard, and then click Next.
- On the Select Server Roles page, in the Roles list, select the Active Directory Lightweight Directory Services check box, and click Next.
- Finish adding the AD LDS server role by following the instructions in the wizard.
Install Microsoft Active Directory Lightweight Directory Services (AD LDS)
To install AD LDS on Windows Vista:
- Visit http://www.microsoft.com/downloads/details.aspx?FamilyID=E1B7F0A5-2131-44FD-9DDE-FA146154E13A.
- Follow the instructions to download and install Microsoft Active Directory Lightweight Directory Services.
To install AD LDS on Windows 7:
- Visit http://www.microsoft.com/downloads/details.aspx?familyid=A45059AF-47A8-4C96-AFE3-93DAB7B5B658.
- Follow the instructions to download and install Microsoft Active Directory Lightweight Directory Services.
Install Microsoft Core XML Services (MSXML) 6.0
- Visit http://www.microsoft.com/downloads/details.aspx?FamilyID=d21c292c-368b-4ce1-9dab-3e9827b70604.
- Follow the instructions to download and install Microsoft Core XML Services (MSXML) 6.0.
Install Microsoft Internet Information Services (IIS) Components
To install Microsoft IIS on Windows Server 2003:
- Log on as an administrator, click Start, point to Control Panel, and then click Add or Remove Programs.
- Click Add/Remove Windows Components.
- In the Components list, select the Application Server check box, and then click Details.
- Select the Internet Information Services (IIS) check box, and then click Details.
- Select World Wide Web Service, and then select the check box.
- Click OK two times to return to the Components list, and then click Next.
- Click Finish when the IIS service is installed.
To install Microsoft IIS on Windows XP:
- Log on as an administrator, click Start, point to Control Panel, and then click Add or Remove Programs.
- Click Add/Remove Windows Components.
- In the Components list, select the Internet Information Services (IIS) check box, and then click Details.
- Select World Wide Web Service, and then select the check box.
- Click OK two times to return to the Components list, and then click Next.
- Click Finish when the IIS service is installed.
To install Microsoft IIS on Windows Vista and Windows 7:
- Log on as an administrator, click Start, point to Control Panel.
- Click Programs and Features.
- Click Turn Windows features on or off to display the Windows Features dialog.
- Click to expand Internet Information Services, and select the World Wide Web Service check box.
- Click OK.
To install Microsoft IIS server role on Windows Server 2008 and Windows Server 2008 R2:
- Log on as an administrator, click Start, point to Administrative Tools, and then click Server Manager.
- In the console tree, right-click Roles, and then click Add Roles.
- Review the information on the Before You Begin page of the Add Roles Wizard, and then click Next.
- On the Select Server Roles page, in the Roles list, select the Web Server (IIS) check box, and then click Next.
- Review the information on the Web Server (IIS) page of the Add Roles Wizard, and then click Next.
- On the Select Role Services page, select the ASP.NET check box.
- Finish adding the Web Server role by following the instructions in the wizard.
Install Windows PowerShell 2.0
- Visit http://support.microsoft.com/kb/968929.
- Follow the instructions to download and install Windows PowerShell 2.0.
Note: Windows 7 and Windows Server 2008 R2 have PowerShell 2.0 installed by default.
Copyright © 2009-2013 Softerra, Ltd. All Rights Reserved