Hello,
Thank you for the confirmation. Below are the detailed instructions for the workflow setup.
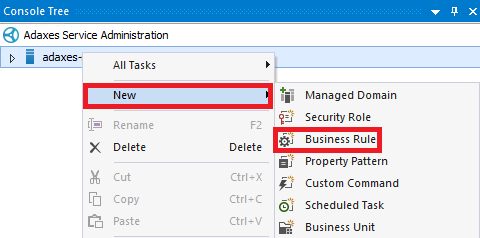
i. Creating the Business Rule
- Launch Adaxes Administration Console.
- In the Console Tree, right-click your service node.
- In the context menu, navigate to New and click Business Rule.
- On step 2 of the Create Business Rule wizard, select the User object type.
- Select After updating a user.
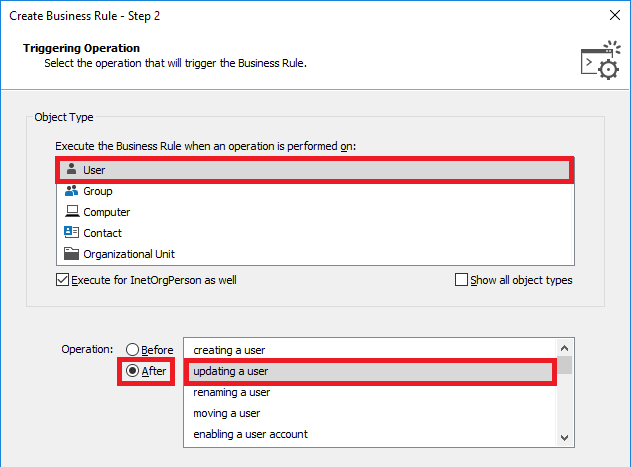
- Click Next.
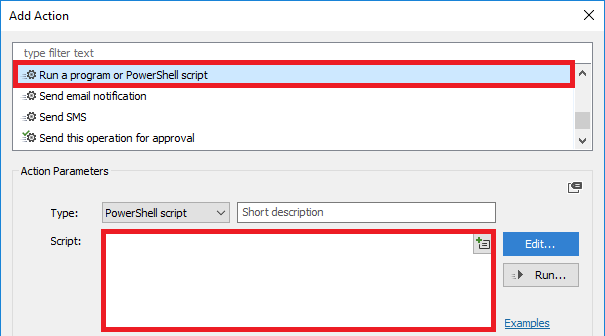
- Click Add an action.
- Select Run a program or PowerShell script.
- Paste the below script into the Script field. In the script, the $filePath variable specifies a template for the file path that will contain the user's photo.
Note: To use the script, install the EXO V2 PowerShell module on the computer where Adaxes service is running.
$filePath = "\\ADAXES-SUPPORT3\Share\Photo\%username%.jpg" # TODO: modify me

function ResizePhoto ($photoBytes, $maxSize, $reduceSizeStep, $reduceSizeInPercents, $maxWidth, $maxHeight)
{
    if ($reduceSizeInPercents -ge 100)
    {
        return ,$photoBytes
    }

    try
    {
        # Calculate the new size, preserve ratio
        $original = [System.Drawing.Image]$photoBytes

        $width = $original.Width
        $height = $original.Height

        if ($NULL -ne $maxWidth)
        {
            if ($width -le $maxWidth -and $height -le $maxHeight)
            {
                return ,$photoBytes
            }

            $ratioX = $maxWidth / $width
            $ratioY = $maxHeight / $height
        }
        else
        {
            $ratioX = ($width - (($width / 100) * $reduceSizeInPercents)) / $width
            $ratioY = ($height - (($height / 100) * $reduceSizeInPercents)) / $height
        }

        $ratio = $ratioY
        if ($ratioX -le $ratioY)
        {
            $ratio = $ratioX
        }

        # Resize the photo
        [int]$newWidth = $width * $ratio
        [int]$newHeight = $height * $ratio

        $newPicture = New-Object System.Drawing.Bitmap($newWidth, $newHeight)
        $graph = [System.Drawing.Graphics]::FromImage($newPicture)

        $graph.Clear([System.Drawing.Color]::White)
        $graph.DrawImage($original, 0, 0, $newWidth, $newHeight)

        $memoryStream = New-Object System.IO.MemoryStream
        $newPicture.Save($memoryStream, [System.Drawing.Imaging.ImageFormat]::Jpeg)
        $newPictureBytes = $memoryStream.ToArray()
    }
    finally
    {
        # Release resources
        if ($original) { $original.Dispose() }
        if ($graph) { $graph.Dispose() }
        if ($newPicture) { $newPicture.Dispose() }
        if ($memoryStream) { $memoryStream.Dispose() }
    }

    if (($NULL -ne $maxSize) -and
        ($newPictureBytes.Length -gt $maxSize))
    {
        $reduceSizeInPercents += $reduceSizeStep
        $newPictureBytes = ResizePhoto $photoBytes $maxSize $reduceSizeStep $reduceSizeInPercents
    }

    return ,$newPictureBytes
}

# Get the photo
try
{
    $photoBytes = $Context.TargetObject.Get("jpegPhoto")
}
catch
{
    return # No photo
}

# Export to a file
[System.Io.File]::WriteAllBytes($filePath, $photoBytes)

# Update the thumbnailPhoto property value
$maxSize = 102400
if ($photoBytes.Length -gt $maxSize)
{
    $thumbnailPhotoBytes = ResizePhoto $photoBytes $maxSize 1 0 $NULL $NULL
}
else
{
    $thumbnailPhotoBytes = $photoBytes
}

$Context.TargetObject.Put("thumbnailPhoto", $thumbnailPhotoBytes)

# Clear the jpegPhoto property
$Context.TargetObject.Put("jpegPhoto", $NULL)
$Context.TargetObject.SetInfo()

# Upload the photo to Microsoft 365
try
{
    $objectId = [Guid]$Context.TargetObject.Get("adm-O365ObjectId")
}
catch
{
    return
}

$userPhotoBytes = ResizePhoto $photoBytes $NULL $NULL $NULL 648 648

Connect-ExchangeOnline -Credential $Context.GetOffice365Credential()

# Update the user's photo
Set-UserPhoto $objectId.ToString() -PictureData $userPhotoBytes -Confirm:$False
- Specify a description for the script and click OK.
- Right-click the created action and then click Add condition.
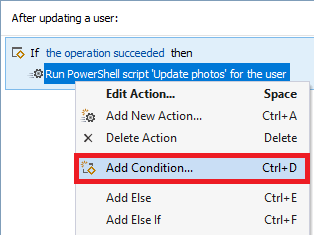
- Select If \ changed.
- Select If JPEG Photo has changed.
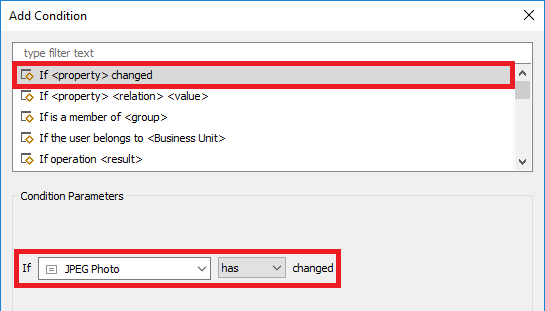
- Click OK.
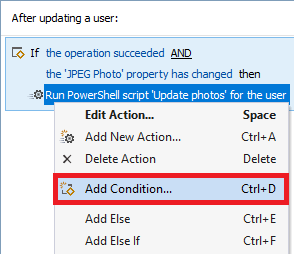
- Right-click the created action and then click Add condition again.
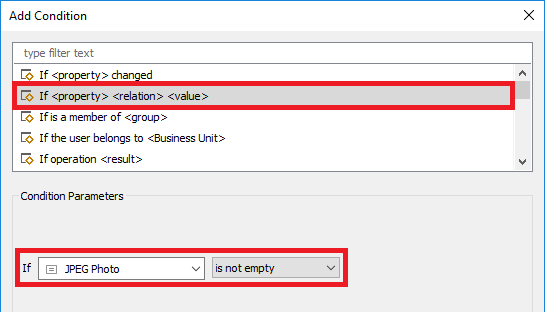
- Select If \ \ \.
- Select If JPEG Photo is not empty.
- Click OK.
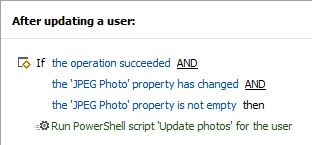
- Click Next and finish creating the Business Rule. Finally, the rule should look like the following:
ii. Creating the Web Interface action
- Open Adaxes Web Interface Configurator.
- In the top left corner, select the required Web Interface.
- In the Actions section, click Add.
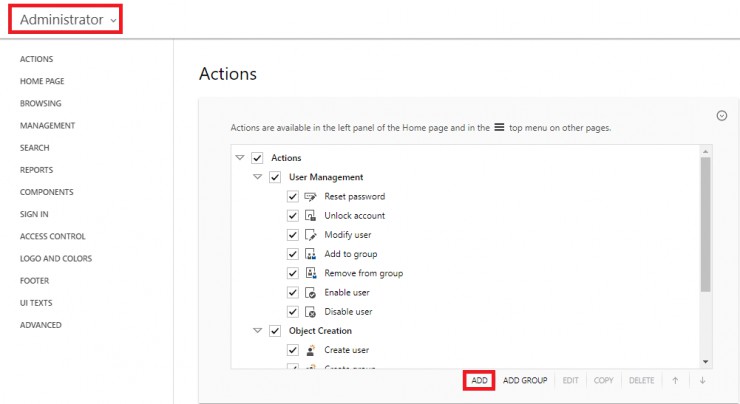
- Select Modify User.
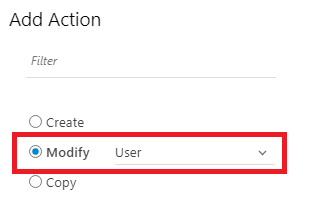
- Click Next 3 times.
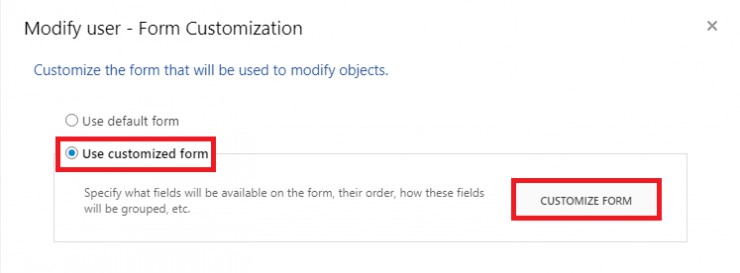
- Select Use customized form and click Customize form.
- Delete all sections except for one (e.g. General).
- Delete all properties from the remaining section.
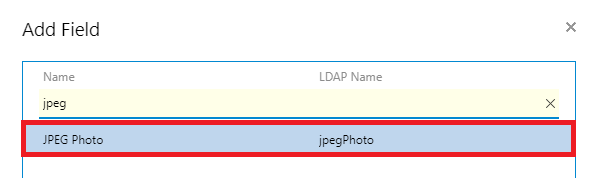
- Below the Fields section, click Add.
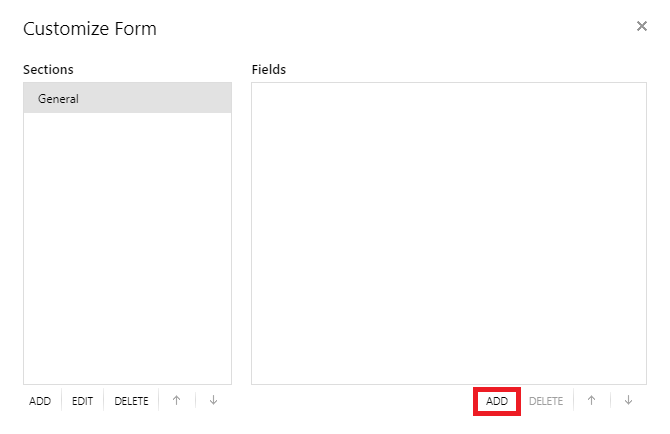
- Select the JPEG Photo attribute.
- Click OK twice and finish creating the action.
- Save the changes.
- Before checking the changes, refresh the Web Interface page using Ctrl+F5.