
Automate Exchange mailbox configuration
Apart from automating the provisioning of Exchange mailboxes, Adaxes also enables you to automatically configure mailbox parameters, such as mailbox features and policies, email addresses, mailbox rights, mailflow settings, mailbox limits and quotas.
With Adaxes, you can manage mailboxes in your on-premises Exchange and in in Exchange Online.
You can configure Adaxes to automatically modify mailbox parameters right after a new mailbox is created, a Microsoft 365 license with access to Exchange Online is assigned, a user account is updated or added to a group, etc.
With the help of custom commands, users can change multiple mailbox parameters or move mailboxes between databases with a single mouse click. Using scheduled tasks, you can configure Adaxes to update mailbox parameters on a regular basis, depending on various conditions.
In this tutorial, you will learn how to configure Adaxes to modify parameters of newly created mailboxes. To automatically perform actions when a certain event takes place, you need to use business rules. Adaxes provides a built-in business rule, After user creation, that is triggered after a new user account is created. You can use the rule to configure Exchange mailboxes.
-
Launch Adaxes administration console.
How
-
On the computer where Adaxes administration console is installed, open Windows Start menu.
-
Click Adaxes Administration Console.
-
-
Expand Adaxes service \ Configuration \ Business Rules \ Builtin and select After user creation.
For details on how to configure and activate the business rule, see Automate user provisioning.
If you use another business rule for mailbox creation or assigning Microsoft 365 licenses, select that rule.
Alternatively, you can create a separate business rule for configuring mailboxes in on-premises Exchange. The rule has to be triggered after a new mailbox is created. This approach is recommended only if user provisioning involves manual creation of mailboxes, or if you have multiple business rules that create mailboxes but want to configure them in one place.
How {id=howto_businessrule_onmailboxcreation}
-
Right-click your Adaxes service, point to New and click Business Rule.
-
Enter a name for the new business rule and click Next.
-
On the Triggering Operation step, select User.
-
Select After and then select creating an Exchange mailbox for the user.
-
Click Next and follow instructions in the wizard.
-
-
To modify mailbox parameters, you need to add the Modify Exchange properties action to your business rule. To do it, right-click a set of actions and conditions, and then click Add Action in the context menu.
-
Select the Modify Exchange properties action and click the Edit button.
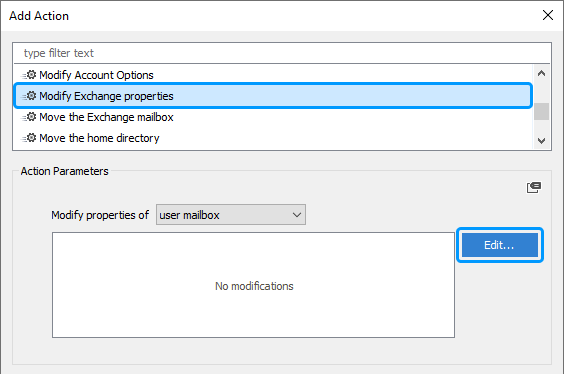
In the Exchange Properties dialog, specify the modifications required.
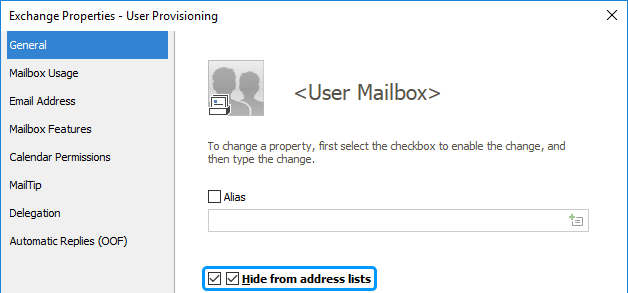
Example 1 – Hide from address lists
-
Activate the General tab.
-
Select the leftmost checkbox for Hide from address lists.
-
Use the second checkbox for Hide from address lists to enable or disable the option.
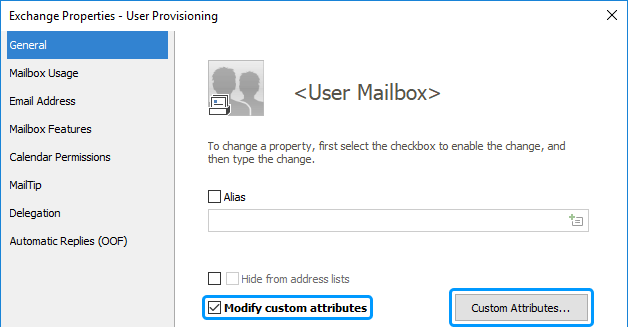
Example 2 – Modify Exchange custom attributes
-
Activate the General tab.
-
Select the Modify custom attributes checkbox.
-
Click Custom Attributes.
-
Select the attribute you want to modify and specify a value.
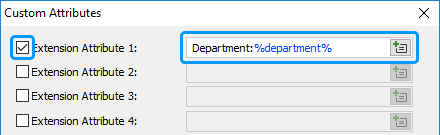
You can use value references (e.g. %username%, %department%) in the attribute values. When the business rule is executed, the value references are replaced with corresponding property values of the user account. For example, if you enter the %fullname%-%department% template, the value references within the template will be replaced with the values of the Full name and Department properties of the user.
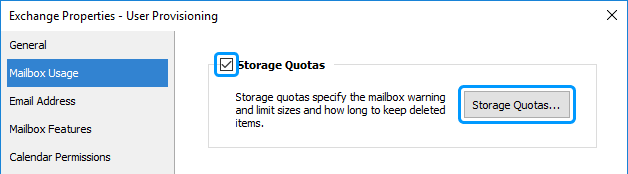
Example 3 – Configure storage quotas and deleted item retention
-
Activate the Mailbox Usage tab.
-
Select the Storage Quotas checkbox.
-
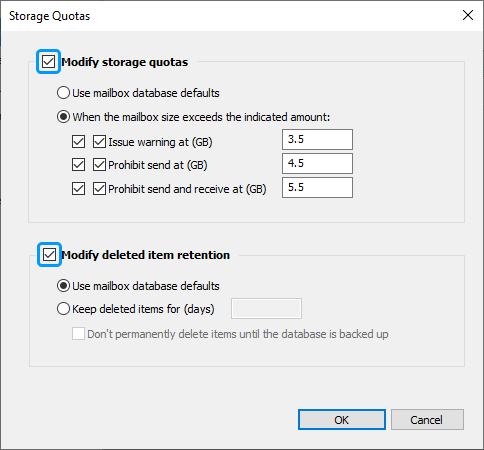
Click the Storage Quotas button.
-
Specify the modifications required.
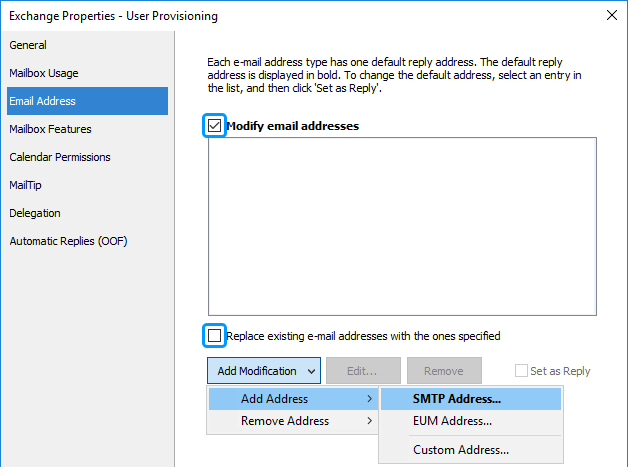
Example 4 – Add an e-mail address
-
Activate the Email Address tab.
-
Select the Modify email addresses checkbox.
-
Clear the Replace existing e-mail addresses with the ones specified checkbox.
-
Click Add Modification, point to Add Address and then click SMTP Address.
-
In the Email address field, Specify a template for the new e-mail address.
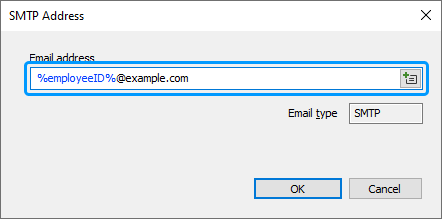
To create a unique e-mail address for each user, use value references (e.g. %username% or %employeeID%). When the business rule is executed, the value references will be replaced with corresponding property values of the user account. For example, if you specify %employeeID%@example.com, the %employeeID% value reference will be replaced with the value of the user's Employee ID property, and the email address will be like 332211@example.com.
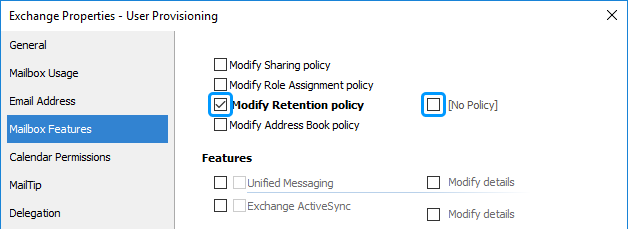
Example 5 – Assign a Retention policy
-
Activate the Mailbox Features tab.
-
Select the Modify Retention policy checkbox.
-
If you don't want any policy to be assigned, leave the No Policy checkbox empty. To assign a policy, select the checkbox, and then select the policy you need.
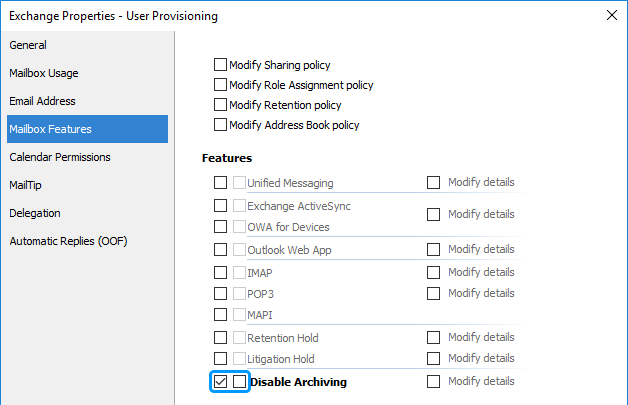
Example 6 – Enable Archiving
-
Activate the Mailbox Features tab.
-
Select the leftmost checkbox for Archiving.
-
Use the second checkbox for Disable Archiving to enable or disable mailbox archiving.
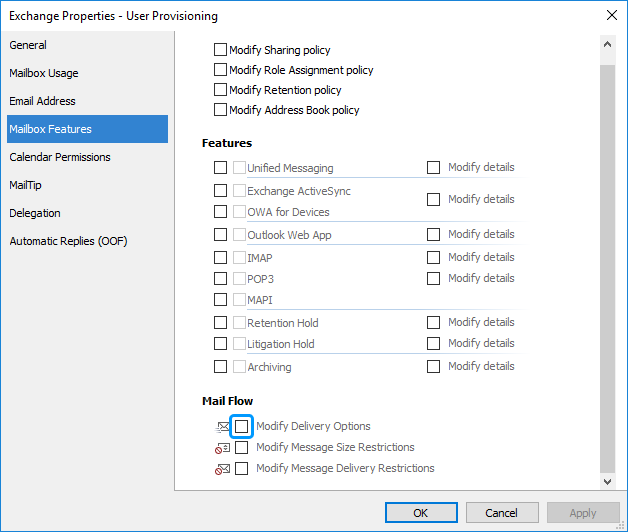
Example 7 – Forward incoming messages to the manager {id=collapse10}
-
Activate the Mailbox Features tab.
-
Select the Modify Delivery Options checkbox.
-
Select the Forwarding Address checkbox.
-
Select the Forward to checkbox and click Browse.
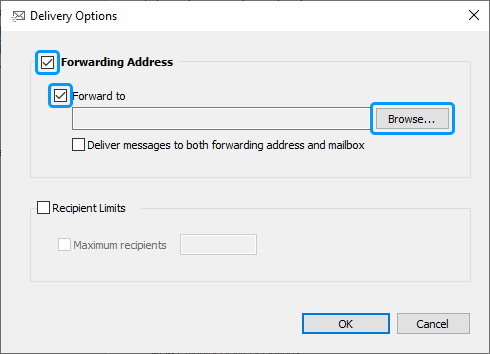
-
Activate the Template tab.
-
In the Template field, enter %manager%.
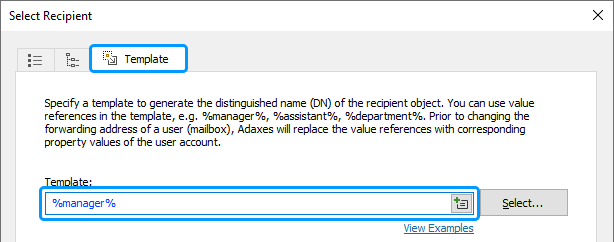
Value reference %manager% will be replaced with the distinguished name (DN) of the user's manager.
-
Click OK.
-
If necessary, select the Deliver messages to both forwarding address and mailbox checkbox.
-
Click OK.
Example 8 – Set a MailTip {id=collapse11}
-
Activate the MailTip tab.
-
Select the Modify MailTip checkbox and type the text below.
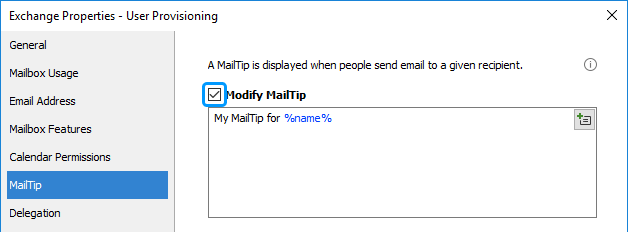
You can use value references (e.g. %fullname%, %adm-ManagerEmail%) in the MailTip text. The value references will be replaced with corresponding property values of the user.
Example:
%fullname% will contact you within 2 hoursValue reference %fullname% will be replaced with the value of the user's Full name property, and MailTip will look like this:
Dexter Morgan will contact you within 2 hours
Example 10 – Grant the Send As right to the manager {id=collapse12}
-
Activate the Delegation tab.
-
Select the Send As checkbox and click Send As.
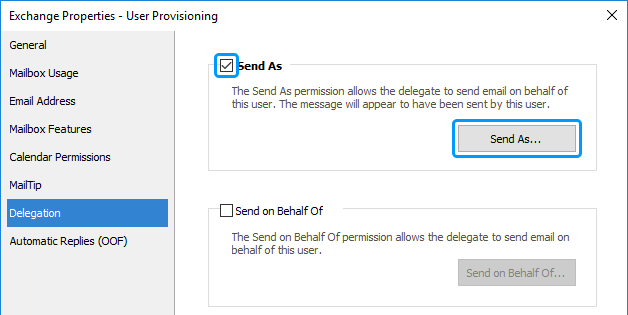
-
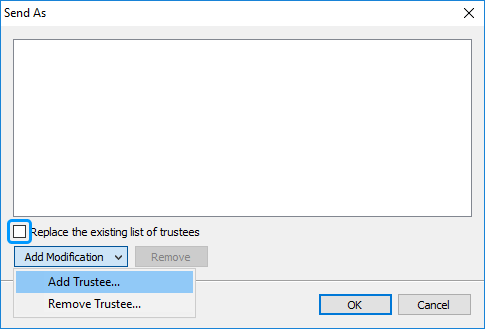
Clear the Replace the existing list of trustees checkbox.
-
Click Add Modification and then click Add Trustee in the drop-down.
-
Activate the Template tab.
-
In the Template field, type %manager%.
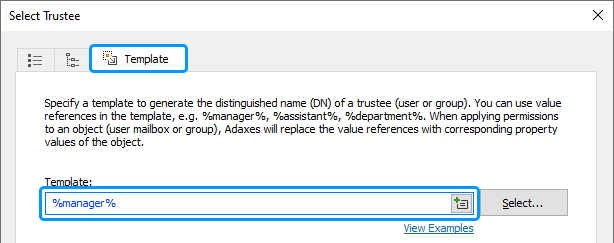
Value reference %manager% will be replaced with the distinguished name (DN) of the user's manager.
-
Click OK two times.
Example 11 – Set automatic reply {id=collapse13}
-
Activate the Automatic Replies (OOF) tab.
-
Select both checkboxes for Send automatic replies.
-
Specify a template for the auto-reply message.
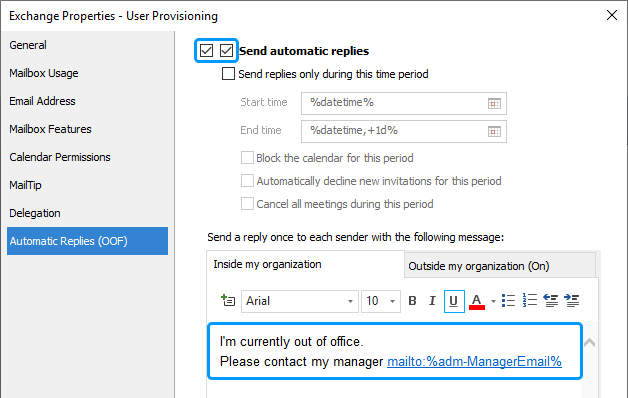
You can use value references (e.g. %fullname%, %adm-ManagerEmail%) in the message text. The value references will be replaced with corresponding property values of the user.
Example:
Please contact my manager mailto:%adm-ManagerEmail%Value reference %adm-ManagerEmail% will be replaced with the email address of the user's manager, and an auto-reply message will look like this:
Please contact my manager mailto:m.laguerta@example.comTo insert a value reference, click the
 button.
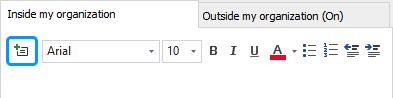
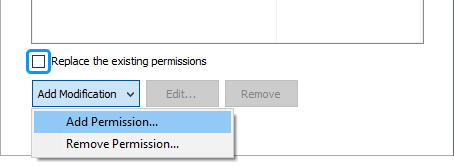
Example 12 – Grant calendar permissions to all members of the user's department {id=collapse14}
-
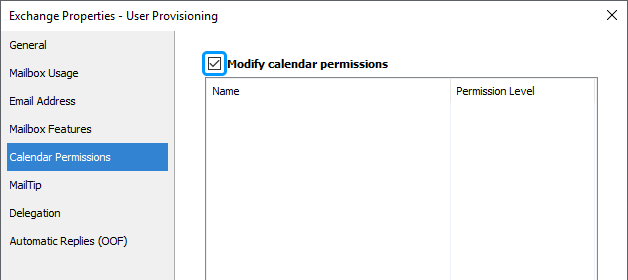
Activate the Calendar Permissions tab.
-
Select the Modify calendar permissions checkbox.
-
Clear the Replace the existing permissions checkbox.
-
Click Add Modification and then click Add Permission in the drop-down.
-
Click the
 button embedded into the Trustee field.
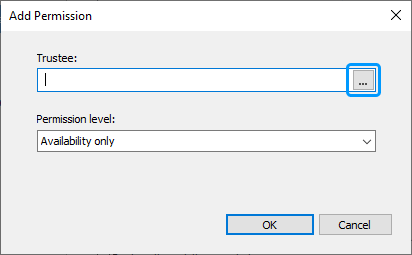
-
Activate the Template tab.
-
In the Template edit box specify a template to generate the distinguished name (DN) of the group that contains the members of the user's department. To insert the department name into the DN, use value reference %department%. The value reference will be replaced with the value of the user Department property.
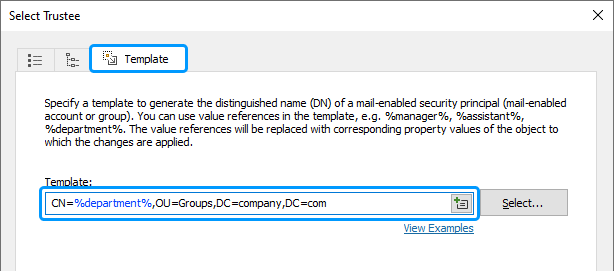
For example, if you what to grant calendar permissions to a group that has the same name as the user's department, located in organizational unit Groups in domain company.com, you can use the following template:
CN=%department%,OU=Groups,DC=company,DC=com -
Click OK.
-
Select the permission level and click OK.
Click OK two times.
-
-
Make sure the Modify mailbox settings action is executed immediately after the Create Exchange mailbox or Activate Microsoft 365 account action.
Online mailboxes
On-premises mailboxes
To move an action up and down, select it, and use the

 buttons.
After an Exchange Online license is assigned to a user, their online mailbox takes some time to create. The correct placement of the Modify Exchange properties action in Adaxes ensures that Adaxes will wait until the mailbox is ready before attempting to perform modifications.
-
To modify specific mailbox settings only if certain conditions are met, you need to add a Modify Exchange properties action to a separate set and assign the necessary conditions to it.
-
Click Add new action set.
-
To add a condition to the new set, right-click it and then click Add Condition in the context menu.
-
To add an action, right-click the set, and then click Add Action in the context menu.
In the following example, the Send As permission is granted to the manager on the condition that the Manager property of the user account is not empty.
-
-
Click Save changes.